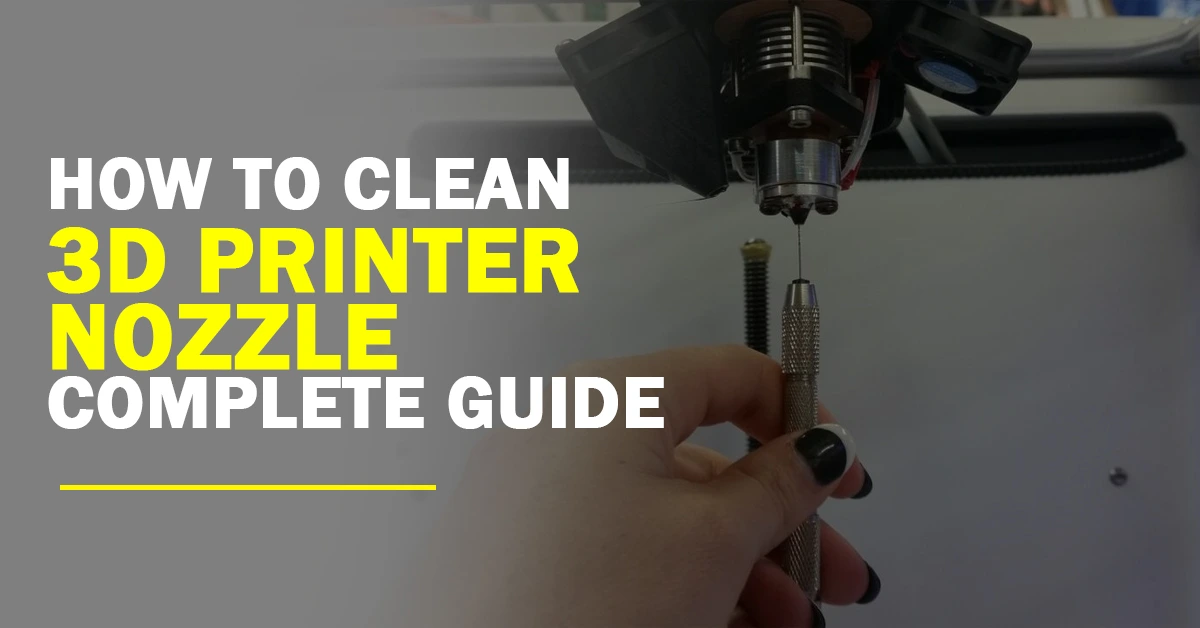
The manufacturing business has been completely transformed by the advent of 3D printing, which enables the production of complex and uniquely crafted items. It is essential, however, to keep the nozzle of your 3D printer clean in order to avoid blockages and maintain the excellent print quality you want. You will learn how to clean the nozzle of your 3D printer with the help of this comprehensive tutorial, which will also provide you with the information and techniques you need to keep your printing performance at its best.
Step 1: Recognize The Signs
Before beginning the cleaning procedure, it is vital to recognize the indicators that indicate a filthy nozzle. This should be done before going in headfirst. Be on the lookout for indications like as insufficient extrusion, uneven flow, or erratic patterns on your prints. These problems might have been caused by dust, dirt, or leftover filament that had accumulated in the nozzle.
Step 2: Gather The Necessary Materials
In order to successfully clean the nozzle of your 3D printer, you will need the following materials:
Tweezers or needle-nose pliers
A sponge or a more absorbent fabric
A filament for cleaning or a nylon filament
A solution for cleaning (this is optional)
Protective eyewear and gloves are strongly suggested.
Step 3: Prepare The Printer
To begin, make sure that your printer is turned off properly and that it is ready for the cleaning procedure. When turning off the electricity to the printer, be sure to follow the instructions provided by the manufacturer. If it is at all feasible, get the temperature of the nozzle up to the appropriate level, and then gently remove any filament that may be within the extruder. If your printer supports the removal of the nozzle, you may do it by using the tools that are necessary.
Step 4: Choose A Cleaning Method
There are a few different approaches one may take when cleaning the nozzle of a 3D printer. The cold pull, heat and mechanical cleaning, and chemical cleaning are the three ways that are used the most often. Take into account the current state of your nozzle, then choose the approach that works best.
Step 5: Perform The Nozzle Cleaning
A) Cold Pull :
Heat the nozzle to the temperature that is suggested for the filament being used in the 3D printer.
Feed the cleaning filament into the extruder such that it travels all the way up to the heated nozzle.
While a modest strain is maintained, the filament should be allowed to cool down.
Once the filament has cooled, gently remove it, being sure to pick out any debris that has gathered along with it.
Carry on with the operation until the cleaning filament emerges uncontaminated each time.
B) Heat and Mechanical Cleaning :
First, get the temperature of the nozzle up to the correct level for the filament being used.
Using tweezers or needle-nose pliers, scrape the nozzle in a gentle manner to remove any debris or obstructions that may have formed.
While cleaning out the nozzle, use extreme caution so as not to break it.
Using a gentle cloth or sponge, wipe off the nozzle to ensure that it is clear of any debris that may still be present.
C) Chemical Cleaning :
Make sure to prepare a cleaning solution that is appropriate for the material that makes up your printer’s nozzles.
Let the nozzle remain submerged in the cleaning solution for the amount of time specified.
Taking the nozzle out of the solution and properly rinsing it with clean water are also required steps.
Before reassembly, ensure that the nozzle has been well dried.
Step 6: Post-Cleaning Check And Reassembly
After you have cleaned the nozzle, you should do a comprehensive check to verify that all debris has been eliminated. If you need to, you may identify any leftover particles by looking at them with a magnifying lens. When you are certain that the nozzle has been thoroughly cleaned, reinstall it in a cautious manner in accordance with the guidelines provided by the manufacturer. Make sure that everything is aligned correctly and that everything is tightened up so that there are no leaks or misalignments.
Step 7: Performing Preventative Maintenance And Analyzing Problems
It is possible that the number of times that you will need to clean the nozzles might be reduced if you make use of preventative maintenance techniques. Maintaining a printing location that is free of dust and other types of debris, regularly cleaning the build plate, and making use of high-quality filament are all things that can be done to cut down on the quantity of residue that is left behind.
You should also familiarize yourself with the processes involved in the process of troubleshooting the process for common issues connected to the nozzle, such as blockages or filament jams. If you have access to this knowledge, it will be much simpler for you to face difficult situations and find solutions to problems.
Conclusion
It is of the greatest significance to make certain that the nozzle of a 3D printer is maintained clean in order to get the highest print quality possible and to avoid any printing difficulties from arising. You will be able to maintain your printer in outstanding condition if you are familiar with the warning signals that indicate a filthy nozzle and if you follow the step-by-step cleaning technique that is explained in this book. Make sure that you keep yourself safe by taking all of the necessary measures and that you clean your printer using the technique that was designed specifically for it.
This will ensure that your printer continues to function properly. If you take good care of your 3D printer and do regular maintenance on it, it will continue to make great prints for as long as you own it, and it will also open the door to an infinite number of creative possibilities. If you do this, it will continue to produce magnificent prints.


Leave a Reply